|
SLIMS |
|
|
Inventory |
|
|
Experiments |
|
|
Making A Dilution Series
This tutorial can be followed
using
the "dilution.slm" database located in the SLIMS tutorial
directory.
You may be requested to locate certain files located in that directory.
To make a dilution series, you will need to perform the following steps:
- Define a
dilution
protocol that indicates where the compounds are plated and the
concentration
of each compound.
- Add a plate using the
dilution protocol so the database can load the dilution series
correctly.
This tutorial walks through the process.
We have three plates
- 081321R1
- 081321R2
- 081321R3
The layout for each of these plates is as follows (all concentrations
are
in microMolar)
| |
1 |
2 |
3 |
4 |
5 |
6 |
7 |
8 |
9 |
10 |
11 |
12 |
13 |
14 |
15 |
16 |
17 |
18 |
19 |
20 |
21 |
22 |
23 |
24 |
| A |
|
|
|
|
|
|
|
|
|
|
|
|
|
|
|
|
|
|
|
|
|
|
|
|
| B |
|
|
|
|
|
|
|
|
|
|
|
|
|
|
|
|
|
|
|
|
|
|
|
|
| C |
|
|
x |
x |
INDOPROFEN/10uM |
5 |
2.5 |
1.25 |
6.25E-01 |
3.13E-01 |
1.56E-01 |
7.81E-02 |
3.91E-02 |
1.95E-02 |
9.77E-03 |
4.88E-03 |
2.44E-03 |
1.22E-03 |
6.10E-04 |
3.05E-04 |
x |
x |
|
|
| D |
|
|
x |
x |
INDOPROFEN/10uM |
5 |
2.5 |
1.25 |
6.25E-01 |
3.13E-01 |
1.56E-01 |
7.81E-02 |
3.91E-02 |
1.95E-02 |
9.77E-03 |
4.88E-03 |
2.44E-03 |
1.22E-03 |
6.10E-04 |
3.05E-04 |
x |
x |
|
|
| E |
|
|
x |
x |
INDOPROFEN/10uM |
5 |
2.5 |
1.25 |
6.25E-01 |
3.13E-01 |
1.56E-01 |
7.81E-02 |
3.91E-02 |
1.95E-02 |
9.77E-03 |
4.88E-03 |
2.44E-03 |
1.22E-03 |
6.10E-04 |
3.05E-04 |
x |
x |
|
|
| F |
|
|
x |
x |
INDOPROFEN-analog
1/10uM |
5 |
2.5 |
1.25 |
6.25E-01 |
3.13E-01 |
1.56E-01 |
7.81E-02 |
3.91E-02 |
1.95E-02 |
9.77E-03 |
4.88E-03 |
2.44E-03 |
1.22E-03 |
6.10E-04 |
3.05E-04 |
x |
x |
|
|
| G |
|
|
x |
x |
INDOPROFEN-analog
1/10uM |
5 |
2.5 |
1.25 |
6.25E-01 |
3.13E-01 |
1.56E-01 |
7.81E-02 |
3.91E-02 |
1.95E-02 |
9.77E-03 |
4.88E-03 |
2.44E-03 |
1.22E-03 |
6.10E-04 |
3.05E-04 |
x |
x |
|
|
| H |
|
|
x |
x |
INDOPROFEN-analog
1/10uM |
5 |
2.5 |
1.25 |
6.25E-01 |
3.13E-01 |
1.56E-01 |
7.81E-02 |
3.91E-02 |
1.95E-02 |
9.77E-03 |
4.88E-03 |
2.44E-03 |
1.22E-03 |
6.10E-04 |
3.05E-04 |
x |
x |
|
|
| I |
|
|
x |
x |
Zinc
Pyrithione/10uM |
5 |
2.5 |
1.25 |
6.25E-01 |
3.13E-01 |
1.56E-01 |
7.81E-02 |
3.91E-02 |
1.95E-02 |
9.77E-03 |
4.88E-03 |
2.44E-03 |
1.22E-03 |
6.10E-04 |
3.05E-04 |
x |
x |
|
|
| J |
|
|
x |
x |
Zinc
Pyrithione/10uM |
5 |
2.5 |
1.25 |
6.25E-01 |
3.13E-01 |
1.56E-01 |
7.81E-02 |
3.91E-02 |
1.95E-02 |
9.77E-03 |
4.88E-03 |
2.44E-03 |
1.22E-03 |
6.10E-04 |
3.05E-04 |
x |
x |
|
|
| K |
|
|
x |
x |
Zinc
Pyrithione/10uM |
5 |
2.5 |
1.25 |
6.25E-01 |
3.13E-01 |
1.56E-01 |
7.81E-02 |
3.91E-02 |
1.95E-02 |
9.77E-03 |
4.88E-03 |
2.44E-03 |
1.22E-03 |
6.10E-04 |
3.05E-04 |
x |
x |
|
|
| L |
|
|
x |
x |
Sodium
Pyrithione/10uM |
5 |
2.5 |
1.25 |
6.25E-01 |
3.13E-01 |
1.56E-01 |
7.81E-02 |
3.91E-02 |
1.95E-02 |
9.77E-03 |
4.88E-03 |
2.44E-03 |
1.22E-03 |
6.10E-04 |
3.05E-04 |
x |
x |
|
|
| M |
|
|
x |
x |
Sodium
Pyrithione/10uM |
5 |
2.5 |
1.25 |
6.25E-01 |
3.13E-01 |
1.56E-01 |
7.81E-02 |
3.91E-02 |
1.95E-02 |
9.77E-03 |
4.88E-03 |
2.44E-03 |
1.22E-03 |
6.10E-04 |
3.05E-04 |
x |
x |
|
|
| N |
|
|
x |
x |
Sodium
Pyrithione/10uM |
5 |
2.5 |
1.25 |
6.25E-01 |
3.13E-01 |
1.56E-01 |
7.81E-02 |
3.91E-02 |
1.95E-02 |
9.77E-03 |
4.88E-03 |
2.44E-03 |
1.22E-03 |
6.10E-04 |
3.05E-04 |
x |
x |
|
|
| O |
|
|
|
|
|
|
|
|
|
|
|
|
|
|
|
|
|
|
|
|
|
|
|
|
| P |
|
|
|
|
|
|
|
|
|
|
|
|
|
|
|
|
|
|
|
|
|
|
|
|
1 Making A
Dilution
Series Protocol
First, go to the Plates inventory section and
select
the "Make Dilution Protocol" command.
You will see the following window:
If there is a dilution protocol that you would like to modify, you can
click on "Set Dilution Template" to start from that protocol. In
this case you will click on "Set Plate
Type" and select a 384 well plate. The plate
should now be the appropriate size.

Next, click on Set Dose Unit and select uM.
If you would like to add your own dose units, see the units inventory section.

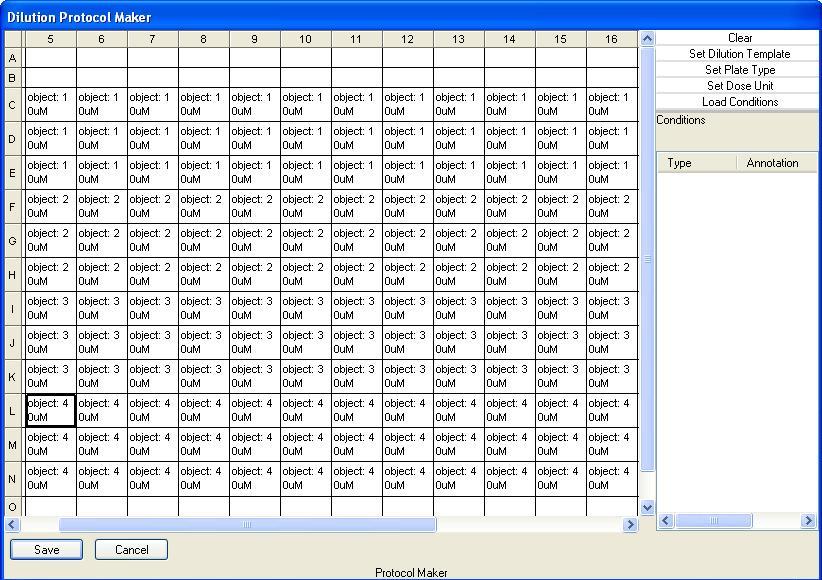
There are four different types of
compounds
in this protocol, so you will need to add four compounds to the
protocol.
To accomplish this, select the well at C5
and while holding down the left mouse button, drag the mouse to E20 and select Set New Compound. You will see
object
1 being placed in the three rows. Compound 1 will represent
Indoprofen
from the above description. We don't put Indoprofen in the
protocol
at this point because we may wish to reuse the same dilution protocols
with different
compounds in the future.
For row E you will highlights
the
wells from E5 to H20 and select Set New Compound, you will now see object 2
in
the next three rows. Repeat this for Compound 3 and Compound 4
until
the protocol looks like this:
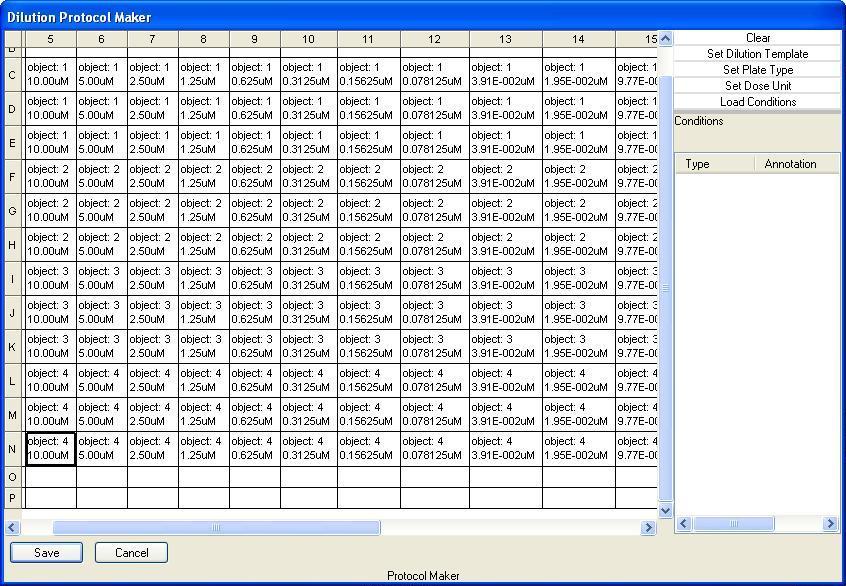
The next step is to set the dilution series concentrations.
Select
the row from C5 to C20 and select Two Fold Dilution
from
the pop up menu. Enter the starting dilution concentration,
(which is
10) for this protocol, you will not need to type in the concentration
at this point, just 10. You should now see the following:

Do the following for the remaining rows D through N. You can select " Set 2 Fold Diluton
10.000" from the pull down list instead of having to type 10 in
every time.
Click on the Save button and give the protocol a descriptive name, such
as
" INDOPROFEN 10uM dilution columns 8-20"
On
Loading Conditions
Conditions are annotations for each well used to seperate different
experimental conditions. Conditions can be any database item
except batches and concentrations. For example, if a dilution
series has indoprofen with and without an addition ibuprofen, ibuprofen
can be selected as a condition for the appropriate wells.
Conditions are loaded through a quicklist
and any object in the quicklist can be used to annotate wells.
All wells with the same batch and conditions will be groups together in
the dilution series.
Below is an example of a loaded quicklist and wells annotated the
addition of Alprostadil, USP.
|
s
Conditions
are an adv
2 Creating Database Plates
Not that the dilution protocol has been created, you
will now want to load the dilution plates into the database. You
need to load these plates into the databsae in order for SLIMS to
recognize them as dilution plates. To load database plates,
select Plates from the Inventory menu and then
click on Add
Dilution Series Plates from the command menu.
Loading dilution plates involves the following steps:
- Selecting a
dilution protocol
- Locate or
enter the barcodes of the plates to load.
- Identify the
compounds represented by object 1, object 2... in the dilution protocol
- Load the plates
into the database
2a Selecting the
Dilution Protocol
You must enter the dilution database plates into SLIMS
before a dilution analysis can be completed. Loading a dilution
assay
is identical to loading a normal assay except that dilution plates are
automatically
identified and dilution series are calculated.
To create a database plate, select Add
Dilution
Series Plates from the plates command menu. You will first
be
presented with the available dilution series protocols.

Select the protocol that you just created. The following window
will
appear:
2b Locate or enter
the barcodes of the plates to load
To make a plate, you will need to specify the compounds used in the
protocol.
The actions menu in the lower left allows you to create plates in two
ways,
you can read the output from a robotic fluidics robot such as a Zymark
Hit
List or you can create the plates by manually specifying the
compounds.
Click on the Make Hit List Manually from
the actions menu. You will be requested to enter the number of
plates that you want to create:

We will be creating three plates.
The
window should now look like:

There are three barcodes in the upper
left
hand window. We will like to change these to our barcodes, so
click
on the first barcode, wait a second and click on it again. You
will
now be able to change the barcode to 081321R1
You can now go ahead and change the rest.
2c Identify the compounds for each
dilution plate
You will now enter the compounds that belong on each plate.
Select
the first barcode, the window should look like:
Notice that there is room for four compounds. Remember that this
particular
protocol only takes four compounds
There are two ways to make dilution plates, manually and
automatically.
Making Dilution Plate Manually
Tedious Methods
The simplest but most time consuming way is to find the batch (or
compound)
you are interested in in the batch or compound view, select the row and
drag
the row over to the batch window in the protocol. If you drag a
batch,
the associated structure will appear in the window. If you drag a
compound
and there is only one batch for the compound, the compound will appear
in
the window, otherwise you will have to select the appropriate batch
from
a list.
The next method is slighly less tedious, but requires you know the
plate,
row and column of the plate where your batch is located. These
are
usually discovered in a hit picking process. For hit picking,
when
you are making a dilution series, you are actually using batches from
other plates. You can either drag a compound or a batch from the
compound or batch inventory menu to the batch_id cell or enter
a source barcode, row and column to select a compound.
Less Tedious Method
Many robotic systems output a hit picking list that you can read to get
the
plate, row and column information. SLIMS only supports the Zymark
format
currently. Additional, the Results view can output the current
list
of compounds in a hit list format.
How to find compounds in the database
Here is an one way to find out where a compound is plated Remember that automatically generated hit
lists
will know the source plate, row and column. Go to the
compounds
inventory menu, and select search. In the menu, we can search for
any
compound whose name contains indoprofen.

Select the desired compound and click either Locate Plates or Get Batches from the command
menu
Locate Plates will indicate
where
the compounds are plated, if the compounds are not in plates, we can
find
out the batches using Get Batches.
The latter might be appropriate if we are creating the plates manually.
An example of searching the compounds for PYRITHIONE and viewing the
results
of get batches is shown below.
We discover that Indoprofen is plated in NINDS002 at E3 and, in our case, has batch
number 5382. Either enter NINDS002, E and 3 in the window or drag
the compound into the batch_id window. To drag inventory
items, click on the row number, hold the mouse button down and
move the pointer over to the batch_id cell.
Similarly locate Zinc Pyrithione, INDOPROFEN-analog 1and
the Sodium
Pyrithione.
You can copy and paste the selected values from one plate to another as
opposed to repeating the tedious process.
Remember to enter these values for EVERY
plate! The dilution plate window should now look like this:
2d Loading Plates into the Database
The final step is to click on "Add
Plates". SLIMS will not load the plates if it detects any
errors, if it doesn't, congratulations! You are done!
To load these plates into the database, you will use the standard add results command. We will
briefly walk you through the process of adding dilution plates.
3 Adding the results
Navigate to the results section and click on the add
button indicated below.
Type in a descriptive name:

Now double click on the newly added
project and click on the Experiments tab (or simply double click on the
newly created project):
The project has no experiments, so click on the Add button to add the
dilution experiment that you just created the protocols for.

The add results wizard should
open. Click on the next button to get the plates page:
Locate the Indoprofen Analog Plates Files. (For a default
install, these will be located in C:\Program
Files\SLIMS\tutorial\Indoprofen Analog Plates). Add all the
plates in the Indoprofen Analog Plates folder.
Since we created the dilution series plates, everything should be ok
and ready to load.

You should still inspect all of the plates by clicking on the View All
button. Click on the "Larger" button a couple of times to get a
larger plate view:

There is definitely a dilution series
here! Close this window and click on Next.
Now we need to tell SLIMS how each plate well is going to be scored
against the controls. Select the "Standard Percent Enhancement"
protocol from the drop down menu. Make sure that the controls are
in the proper locations:
Click next. The next window allows setting the options for
correcting spatial systematic errors cause by various experimental
problems such as robot error or plate evaporation. Since we are
doing a dilution series, you can turn off this feature:
Clicking on next will load the plates! Click on the finish button.
Now you want to see the results, so double click on the Indoprofen
Analogs Dilution Series Experiment.

Go to the dilution series by clicking on the dilution tab:

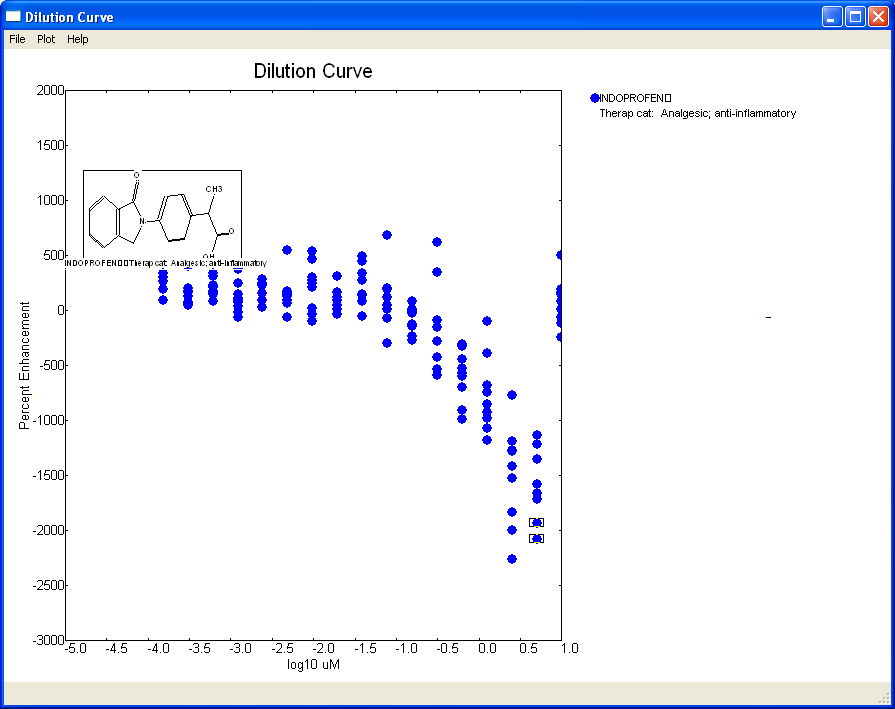
To plot one or more dilution series, select the row you would like to
plot, and click on the Plot Dilution button from the commands menu:
Clicking on the "To Excel" button will make a nice Microsoft Excel
report for all of the dilution compounds that can be used to make
production quality graphs.
| Batch
ID |
Vendor |
Catalogue Number |
Name |
|
|
|
|
|
|
|
|
|
|
|
| 707 |
Default (change me to your lab) |
1500351 |
INDOPROFEN
Therap cat: Analgesic; anti-inflammatory |
|
|
|
|
|
|
|
|
|
|
|
|
|
Average |
Standard Deviation |
Concentration |
Unit |
Values |
|
|
|
|
|
|
|
|
|
|
266.8053 |
128.8492 |
0.000153 |
uM |
86.69309 |
261.6199 |
187.6671 |
261.2778 |
419.2037 |
453.5741 |
94.42066 |
297.0805 |
339.7112 |
|
|
186.2945 |
144.3043 |
0.000305 |
uM |
51.13885 |
69.98259 |
161.1792 |
444.3889 |
131.2037 |
175.6481 |
398.7384 |
47.8548 |
196.5158 |
|
|
200.7631 |
79.10405 |
0.00061 |
uM |
168.1123 |
173.6232 |
154.4239 |
308.9815 |
332.6852 |
204.9815 |
84.5828 |
229.9645 |
149.5127 |
|
|
111.2319 |
134.0815 |
0.001221 |
uM |
75.67127 |
149.8019 |
38.69486 |
-65.2407 |
93.57407 |
374.1667 |
243.9561 |
-21.4474 |
111.9102 |
|
|
181.9883 |
82.55665 |
0.002441 |
uM |
229.9767 |
151.0463 |
232.4655 |
223.3519 |
282.0185 |
90.61111 |
26.86737 |
156.7271 |
244.8306 |
|
|
153.3065 |
164.3937 |
0.004883 |
uM |
-67.7901 |
151.224 |
145.7131 |
144.2407 |
124.3889 |
546.9074 |
67.74913 |
92.89033 |
174.4352 |
|
|
210.6915 |
217.2419 |
0.009766 |
uM |
-37.2134 |
13.62912 |
300.7296 |
269.2778 |
466.3148 |
531.7963 |
208.1026 |
-99.4944 |
243.0816 |
|
|
144.9745 |
134.0784 |
0.019531 |
uM |
91.31514 |
-39.3467 |
166.1568 |
116.6852 |
304.8333 |
305.1296 |
9.596466 |
306.2625 |
44.13828 |
|
|
221.1837 |
178.2353 |
0.039063 |
uM |
84.55983 |
-56.946 |
332.5506 |
135.9444 |
134.463 |
446.7593 |
149.0754 |
274.7814 |
489.4653 |
|
|
109.2628 |
264.0296 |
0.078125 |
uM |
196.0224 |
-71.701 |
116.9142 |
43.7963 |
188.3889 |
-299.315 |
683.3804 |
8.284751 |
117.5943 |
|
|
-82.6853 |
119.2155 |
0.15625 |
uM |
-29.5693 |
-233.828 |
-16.592 |
-128.352 |
79.64815 |
-272.648 |
-2.42758 |
8.50337 |
-148.902 |
|
|
-140.932 |
399.902 |
0.3125 |
uM |
-280.76 |
-153.654 |
-593.46 |
-154.722 |
-424.944 |
618.6111 |
-88.1263 |
-537.388 |
346.0512 |
|
|
-598.308 |
236.1525 |
0.625 |
uM |
-576.927 |
-309.559 |
-909.359 |
-602.13 |
-444.796 |
-988.204 |
-324.453 |
-529.737 |
-699.604 |
|
|
-769.036 |
342.6402 |
1.25 |
uM |
-1069.53 |
-97.8334 |
-678.79 |
-1182.87 |
-391.759 |
-927.759 |
-853.73 |
-741.36 |
-977.687 |
|
|
-1506.41 |
457.3553 |
2.5 |
uM |
-1191.66 |
-1414.41 |
-1523.2 |
-1276.2 |
-1998.57 |
-2259.31 |
-769.343 |
-1839.92 |
-1285.07 |
|
|
-1559.61 |
321.5183 |
5 |
uM |
-1217.44 |
-1136.37 |
-1352.36 |
-1933.39 |
-2081.83 |
-1661.09 |
-1358.52 |
-1715.31 |
-1580.2 |
|
|
72.59174 |
215.8984 |
10 |
uM |
-117.21 |
6.873819 |
83.31543 |
193.1296 |
-247.759 |
500.6852 |
160.6622 |
-67.3574 |
140.9865 |

|